Shadow Expedition Теневая Экспедиция
Русская версияThe English names of the event and of the map objects are taken from the Puzzles & Chaos Fandom Wiki (an outside fan wiki about the game, not ours). The other in-game terms are translated from the Russian client. None of them have been checked against the English client.
For our realm this is the first such event. We do not know who will join the battle or when, and we know in advance that many will make mistakes. So there is no breakdown of leagues and rewards here — only what you need to understand so as not to waste the most valuable thing in this event: supplies. The key parts are sections 3 and 4.
1. What this event is
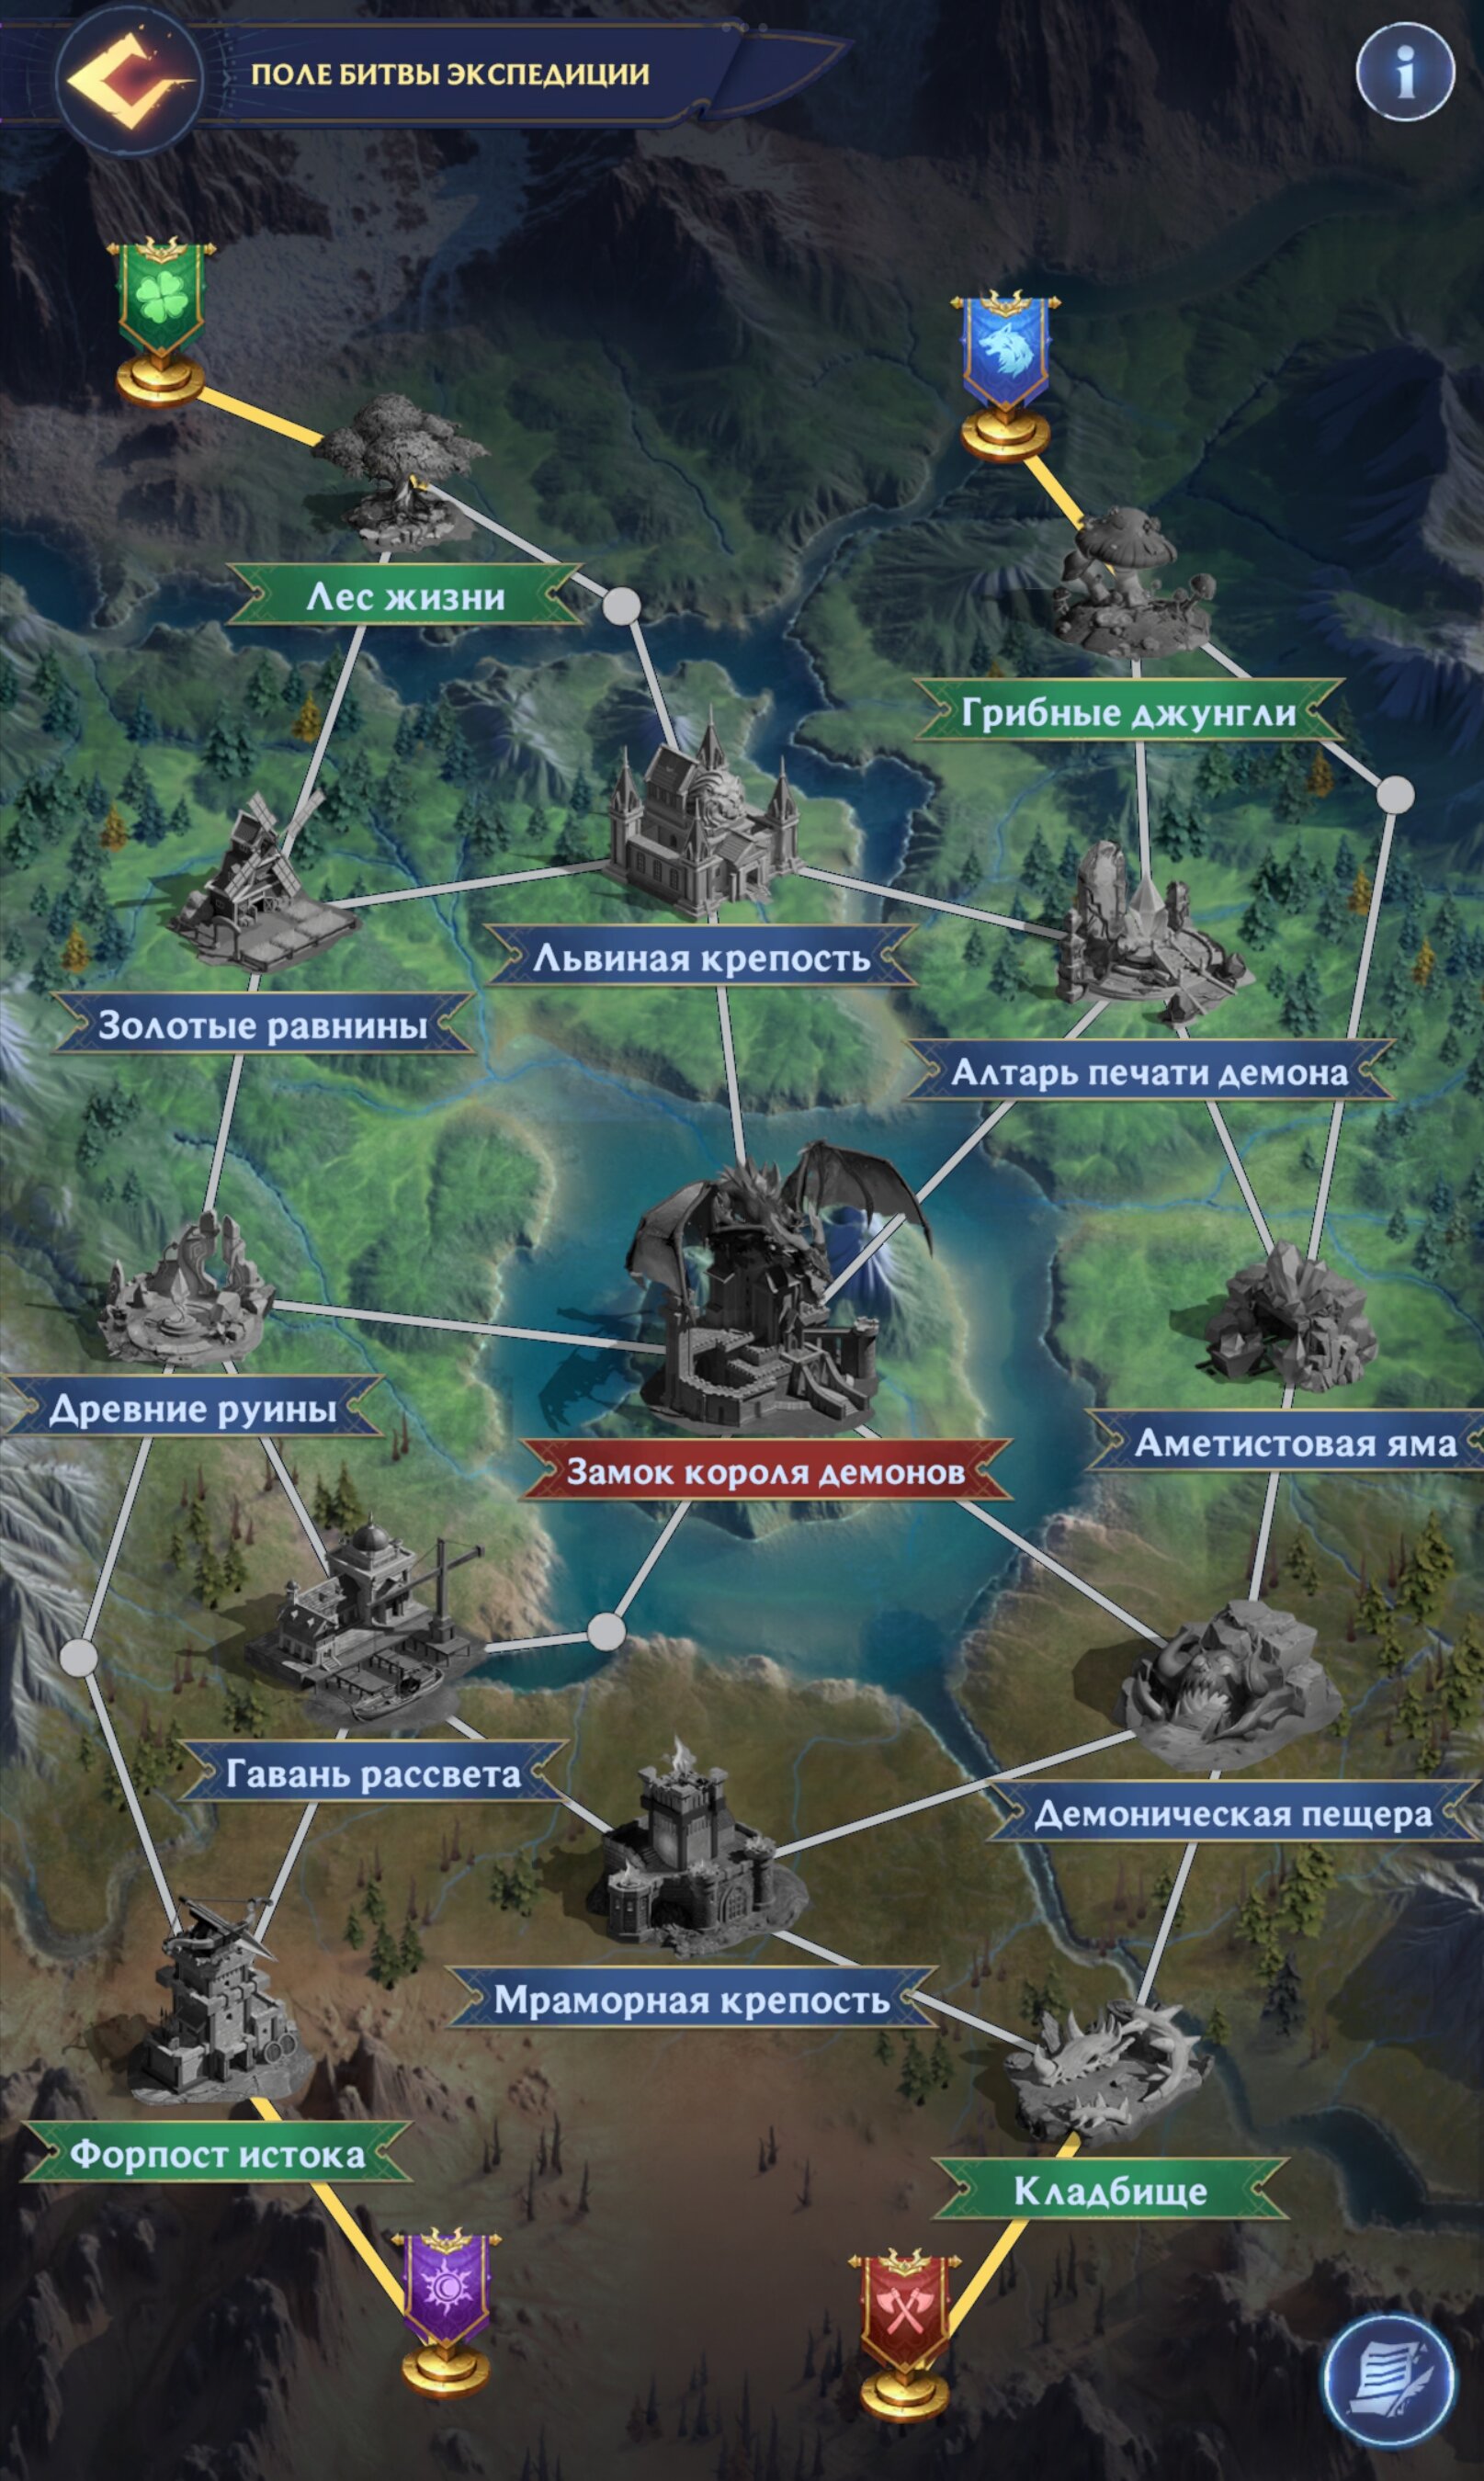
The alliance fights its way across a map of monsters in match-3 battles. The goal is the Evil Dragon King Castle in the centre.
- Registration. Only alliances of level 5 or higher take part. Once registration opens, players with a Citadel of level 20+ must choose 20 heroes and register: these are the heroes you will later build your attack lineups from. Only players assigned to a squad get onto the battlefield.
- Four squads: green, blue, purple and red. Each one starts from its own point at the edge of the map. There are 13 objects on the map: 4 dens in the outer ring, 8 in the inner ring, and the Castle.
- You can only attack what is next to you. At the start a squad can only hit the den next to its base. After that — only dens connected by a road to a den already taken by your squad. A den taken by a neighbouring squad does not open a road for you.
- Heroes in the event are set to a fixed level, but hero enhancements and what the Russian client here calls "Weapon of Fate" still apply. Judging by the English text of the rules on the Fandom wiki, "Weapon of Fate" means Curios: that is the word used there.
- Points are given for damage dealt — both personal and alliance points at once.
Supplies (backpacks)
This is the main resource of the event.
- The first battle with each hero is free. But only once for the whole event, not once a day.
- Each further battle with the same hero costs supplies: from 1 to 5 per hero, never more than 5.
- Supplies are handed out every day at 0:00 UTC and they pile up. At the end of the event all remaining supplies disappear.
2. The goal is the Castle; everything else is an obstacle
The Castle is the only goal of the event. All other dens are simply obstacles on the way to it. There is no point at all in spending precious backpacks on everything in sight: you need to beat exactly the minimum required to get access to the Castle.
Here is what the event rules say about it:
- after the Castle is taken, the monsters flee from all remaining objects, and the alliance immediately gets the points for all the fleeing monsters;
- alliances are ranked by total points; on a tie, the alliance that took the Castle earlier ranks higher; if they took it on the same day — the one that took it faster. The client says it outright: "try to capture it before the others".
Our conclusion, not the text of the rules. Since after the Castle the alliance collects the points for everything left on the map, all alliances that took the Castle most likely end up with the same alliance points. Then their places are decided only by time: the day of capture and, within that day, the speed of the siege. Whatever you beat before the Castle beyond the necessary minimum added nothing to the alliance's points — it only burned backpacks. Personal points for such battles will of course be credited, but you can earn them later at no cost to the alliance in the captured Castle: there the monsters have infinite health and personal points have no cap.
Den rewards are no reason to capture dens either. After the Castle is captured, every player receives all the rewards for all the dens without exception, including the ones nobody took: a message appears on screen saying that all the enemies have fled and you receive all the rewards. So an extra den is a pure loss: the backpacks are spent, and you would have received its reward anyway.
3. The key point: the Castle is opened by buildings, not by roads
To open the Castle, the alliance must take four buildings of the inner ring. Any four.
Not understanding this is a common mistake. People look at the map, see the roads leading to the Castle and think they must take the buildings that have a line to the Castle. From that they conclude that Gold Plains, which has no such road, is useless. That is wrong. What counts is not the paths to the Castle but the second-level buildings — all of them equally. Gold Plains opens the Castle exactly as well as Lionheart Fort does.
This leads to a completely different logic for going through the map.
4. The map
The inner ring is a loop of eight buildings:
Gold Plains — Lionheart Fort — Demon Sealing Altar — Amethyst Pit — Demonlord Cave — Obsidian Fortress — Dawnlight Harbor — Ancient Ruins — and back to Gold Plains.
Each outer-ring den opens two neighbouring inner-ring buildings to its squad:
| Squad | Outer-ring den | Opens in the inner ring |
|---|---|---|
| Green | Forest of Life | Gold Plains, Lionheart Fort |
| Blue | Mushroom Jungle | Demon Sealing Altar, Amethyst Pit |
| Red | Boneyard | Demonlord Cave, Obsidian Fortress |
| Purple | Origin Outpost | Dawnlight Harbor, Ancient Ruins |
A squad will not get access to an inner-ring building until it beats its own outer-ring den.
Joint attack. If two neighbouring squads have each taken a building next to the same third one, they can hit it together. For example, Lionheart Fort is open to the greens straight from Forest of Life, and to the blues as soon as they take Demon Sealing Altar. From that moment the greens and the blues attack Lionheart Fort together.
So the wisdom is in the order. First each squad takes on its own whatever nobody else can reach. A building that two squads can reach is left for last and hit together. The greens first attack Gold Plains, and only then go for Lionheart Fort together with the blues. If the greens start on Lionheart Fort right away and the blues dawdle, the greens will take the fort by themselves, with no help, and then be forced to take Gold Plains alone as well.
Damage to monsters carries over. If you attacked a monster and did not beat it, no problem: it will be easier for your teammate, because you have already knocked off part of its strength.
5. Our plan: three squads
An alliance does not have to field all four squads. Most alliances simply do not have enough active players, so even many experienced alliances field only three — that is more than enough. Our realm is young, we have few active players, and we need to use only three squads.
For the first time we take green, blue and purple. There will be no red squad.
Which squads to use and who goes into which squad is decided by the Militarist. They also give each squad a strict order of attacks. The first distribution will be random and most likely not optimal — that is fine, we are only learning.
| Squad | Order of attacks | Do not touch |
|---|---|---|
| Green | Forest of Life → Gold Plains → Lionheart Fort together with the blues → Castle | — |
| Blue | Mushroom Jungle → Demon Sealing Altar → Lionheart Fort together with the greens → Castle | Amethyst Pit |
| Purple | Origin Outpost → Ancient Ruins (or Dawnlight Harbor — the Militarist decides) → Castle | the other of these two buildings (with Ancient Ruins — Dawnlight Harbor) |
The four inner-ring buildings that will open the Castle: Gold Plains, Demon Sealing Altar, Lionheart Fort and Ancient Ruins (or Dawnlight Harbor).
The purples take their two dens entirely on their own. The Militarist will distribute players so that the squads have roughly equal total power — the squads will be roughly equal in strength. That is why each squad should take roughly the same number of dens, and there is no point in making the greens do extra work by helping two squads at once. Ancient Ruins is better for the purples than the Harbor because it borders Gold Plains: if the greens cannot cope, the purples will be able to help them.
The main thing for the purples: the whole squad hits the same building. Do not start hitting both at once: that is backpacks wasted.
Every time there are hasty players who, without reading either the alliance mail or this guide, rush to hit the first den that opens. Most often it is the Amethyst Pit: it opens for the blues right away, it is right there and it looks tempting. But the Pit gives nothing — it only takes your backpacks. Every backpack spent on it is a backpack that will be missing later at Lionheart Fort and at the Castle. The purples have their own trap just like it: whichever of the two buildings — Ancient Ruins or Dawnlight Harbor — the Militarist did not assign to you. Don't do this.
If you have read this far, this is not about you. And there is no point writing about those who have not: they will never see these words.
It all comes down to the monsters
According to the description in the client, all buildings of one ring are the same: every outer-ring den gives the same points, every inner-ring building does too, and the enemies are described identically — "weak" outside, "strong" inside. The real difference between them is which monsters are hiding behind each den, and at least of which main elements.
So the plan above is a baseline. The monster line-up is visible before you attack. The Militarist, having looked at the monsters and knowing whom they have put into which squad, draws up the strategy for this particular event: for example, decides whether the purples go to Ancient Ruins or to Dawnlight Harbor. There will be time for that.
6. Battle: which heroes and against whom
- Do not throw yourself at the first monster you see in the den assigned to you. Use your head and pick the one your lineup will be most effective against. Or the other way round: build a lineup for the monster instead of going in with your usual one.
- Spend your second and third lineups on the first ring (if you have them). Save your first lineups for the second ring and the Castle.
Why. The free battle with each hero is given once for the whole event. Against the strong monsters of the second ring and the Castle a weak lineup will do little, and its free battle will be almost wasted. Against the weak monsters of the first ring it will deal noticeable damage — without spending a single backpack. Few of us are likely to have two full lineups strong enough to wipe out monsters, but even an incomplete lineup will knock off part of their strength, and damage carries over. And since we are learning, such battles also improve our understanding of the event.
7. Two days: dens first, then the Castle
Ideally an alliance, having started the event, finishes it right away by destroying the Castle. That is exactly what happens with strong alliances in old realms. But we are small, this is our first event, we do not know who will join the battle and when, or who will fumble and mess up and how.
So we split the event into two days.
- Day one — we take the dens, and that is all. As soon as the four inner-ring buildings are taken, we stop spending backpacks anywhere: they pile up until the end of the event and all of them will go to the Castle.
- Day two — the Castle. We wait for peak activity among our active players, or agree in advance on a time when all of them will be present, and smash the Castle. By then new free backpacks will have arrived, and everyone will have more attempts.
If we did not manage to beat all the required dens during the whole first day, it makes sense to wait for more backpacks to pile up, and then attack the Castle with all our active players and all our might.
How the siege works. The Castle capture is started by R4 officers and above, and from that moment the siege timer runs. Once it is started, all squads can hit the Castle. Judging by the English text of the rules on the Fandom wiki ("used less time occupying it"), "faster" in the ranking rules means less time spent on the siege. So R4 does not start the siege until the active players have gathered: once the timer is running, the alliance's time is ticking away.
After the Castle is taken, the monsters inside it get infinite health: you can keep hitting them, but that only brings personal points; alliance points no longer grow.
8. For the Militarist and officers
- Distribute players among the squads before the event starts. The squads are green, blue and purple.
- Look at the monsters in all the dens on the route and decide where the purples go — to Ancient Ruins or to Dawnlight Harbor.
- Give each squad a strict order of attacks — following the table in section 5 — and separately name the dens that must not be touched.
- After the four buildings are taken, announce: no more spending backpacks.
- Set the time for the Castle assault and announce it in advance in the alliance mail and chat. Start the siege only when the active players are gathered.
Get in touch
Found a mistake or an inaccuracy? Got a question about a mechanic? Need a guide on a topic that is not here yet?
Write to pnc.wiki.101@gmail.com — I will fix it, answer it, or write it.
One special request: if a mechanic in the game does not look the way it is described here, send a screenshot from the client. A screenshot settles an argument faster than any amount of reasoning, and in these guides it outranks any outside source.